 Tweet
Tweet
Trò chơi Flappy Bird của anh Nguyễn Hà Đông quá nổi tiếng đến nổi tôi có một bài viết để hướng dẫn mọi người lập trình game này trên Arduino. Trò chơi được lập trình sử dụng màn hình cảm ứng TFT để chơi.
Xem video từ bài viết : http://dandientu.com/lap-trinh-nhung...n-arduino.html
Nguyên lý trò chơi cũng khá đơn giản, nhưng có thể gây nghiện, nhớ là đừng có ném thiết bị khi đang chơi nhé, kẻo tốn tiền. Bạn chạm vào màn hình cảm ứng để chú chim bay lên sao cho không bị va vào các cột đang di chuyển với tốc độ càng lúc càng nhanh. Trò chơi, có thể lưu lại điểm số ngay cả khi không cấp điện cho máy.
Để làm được dự án này, bạn cần hiểu cách lập trình màn hình cảm ứng TFT với Arduino.
Mã nguồn chương trình
Vì phần mã nguồn khá dài, nên bài viết sẽ mô tả từng phần, tất cả mã nguồn sẽ được đính kèm theo link phía dưới bài viết này.
Chúng ta sẽ sử dụng thư viện UTFT và URTouch của Henning Karlsen:
UTFT: http://www.rinkydinkelectronics.com/library.php?id=51
URTouch: http://www.rinkydinkelectronics.com/library.php?id=92
Chúng ta cũng cần thêm thư viên EEPROM để lưu trữ dữ liệu của game.
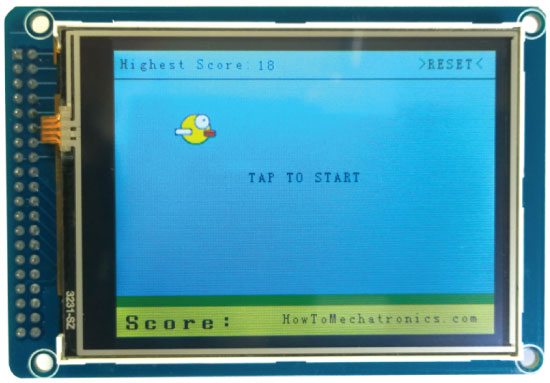 Trong chương trình hàm initiateGame(); dùng để khởi động trò chơi. Đầu tiên chúng ta cần phải xóa màn hình, sau đó vẽ màu nền xanh, vẽ phần dưới cùng, thêm văn bản và gọi hàm drawBird () để vẽ chim. Sau đó, chúng ta cần một vòng lặp trong khi ngăn không cho trò chơi bắt đầu cho đến khi chúng ta chạm vào màn hình. Vì vậy, nếu chúng ta nhấn ở góc trên bên phải, chúng ta có thể đặt lại số điểm cao nhất bằng không và nếu chúng ta bấm bất cứ nơi nào khác trên màn hình chúng ta sẽ thoát khỏi vòng lặp while và vào vòng lặp chính để bắt đầu trò chơi.
Trong phần vòng lặp chính chúng ta sử dụng biến xP, yP để vẽ các cột. Lúc đầu, biến xP có giá trị 319 là kích thước của màn hình và biến yP có giá trị là 100, là chiều cao của cột đầu tiên. Mỗi lần lặp lại giá trị của biến xP được giảm dần, giá trị của biến movingRate lúc đầu là 3 và khi chúng ta chơi, giá trị đó sẽ tăng lên.
Nguyên lý làm việc trong game: chúng ta có các cột rộng 50px di chuyển từ phải sang trái và mỗi cột sẽ có chiều cao ngẫu nhiên. Để làm cho chúng di chuyển, sau mỗi lần lặp, chúng ta cần phải xóa màn hình và vẽ lại các cột ở vị trí mới. Tuy nhiên, chúng ta không thể làm điều đó do tốc độ làm mới màn hình thấp, nên sẽ gây ra sự nhấp nháy trên màn hình đồ hoạ. Để kích hoạt tất cả các điểm ảnh, màn hình cần thêm một chút thời gian, vi vậy chúng ta sẽ chỉ vẽ lại những gì đang di chuyển.
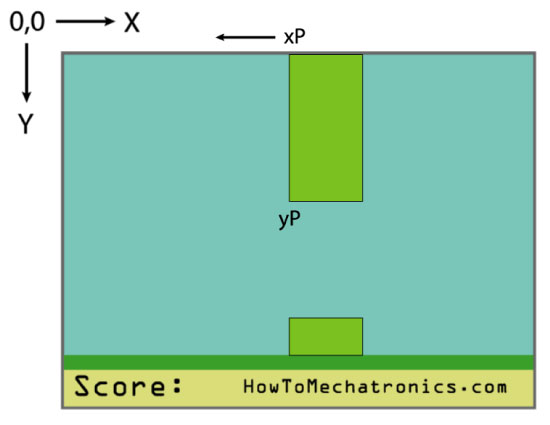 Chúng ta hãy xem xét hàm drawPilars (). Chúng ta sử dụng biến xP và yP trong hàm fillRect () để vẽ các cột. Vì vậy, mỗi lần lặp, nó sẽ vẽ thêm các cột hình chữ nhật màu xanh dương ở vị trí mới từ bên trái và bên phải của cột và xóa các cột trước đó, theo cách đó chúng ta cải thiện tốc độ chỉ vẽ lại các trụ di chuyển. Các câu lệnh if được bổ sung vì lý do hàm fillRect () không hoạt động nếu thông số ‘x2’ của nó có một giá trị ra ngoài kích thước màn hình. Ngoài ra, ở phần cuối của chức năng tùy chỉnh này, chúng ta cần phải in giá trị của điểm số đạt được.
Trở lại phần vòng lặp chúng ta có biến yB là vị trí y của con chim và nó phụ thuộc vào tỷ lệ rơi xuống sau mỗi lần lặp tăng lên và theo cách đó chúng ta có được ảnh hưởng của gia tốc hoặc lực hấp dẫn. Ngoài ra, ở đây chúng ta kiểm tra va chạm và sử dụng lệnh if quản lý nếu chim chạm lên trên, lên mặt đất hoặc các cột thì trò chơi sẽ kết thúc.
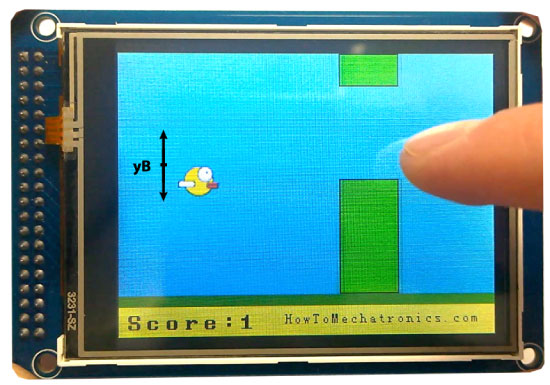 Tiếp theo là dùng hàm drawBird() để vẽ chú chim. Hình chú chim được chuyển đổi thành hình bitmap bằng công cụ ImageConverter565 của Henning Karlsen. File “.c” được tạo ra nhờ công cụ bổ sung vào thư mục để tải lên khi chạy chương trình. Chú chim được gắn tọa độ X với biến xB và biến yB với tọa độ Y. Tương tự như các cột, chúng ta sẽ xóa trạng thái của chú chim trước đó và vẽ 2 hình chữ nhật xanh dương ở trên và dưới chú chim.
Trở lại vòng lặp, chúng ta có thể thấy rằng sau khi một ống di chuyển đi qua màn hình, biến xP sẽ trả lại giá trị 319, chiều cao yP sẽ có giá trị ngẫu nhiên từ 20 đến 100 và điểm số sẽ tăng lên 1. Lệnh if kế tiếp là để điều khiển chú chim. Nếu chúng ta chạm lên màn hình, chúng ta sẽ thiết lập hệ số rơi là số âm sẽ làm cho chú chim bay lên và nếu ngược lại sẽ không có gì xẩy ra nếu chúng ta chạm và giữ ngón tay trên màn hình. Lệnh if cuối cùng tạo độ khó cho game, tốc độ di chuyển sẽ tăng lên sau khi người chơi đạt được điểm số. Cuối cùng là hàm gameOver(). Sau khi làm trễ 1 giây, nó sẽ xóa màn hình, in ra điểm số, nếu điểm số cao hơn điểm số cao nhất, nó sẽ ghi kết quả vào EEPROM, nó sẽ khởi tạo lại các giá trị bạn đầu của các biến trong game và cuối cùng nó sẽ gọi lại hàm initiateGame() và chạy lại game từ đầu.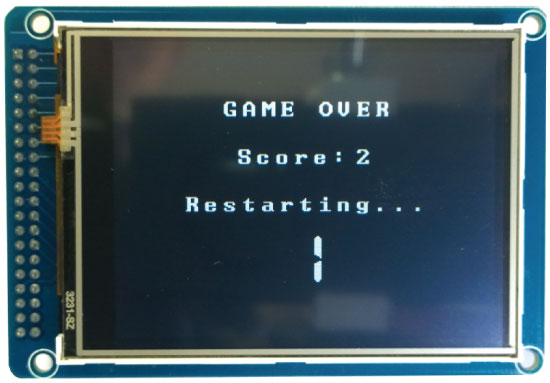
Như vậy, bài viết đã chỉ ra làm thế nào để viết 1 game trong Arduino, sau đây là toàn bộ mã nguồn của chương trình.
/* Arduino Game Proejct * Program made by Dejan Nedelkovski, * www.HowToMechatronics.com */ /* This program uses the UTFT and URTouch libraries * made by Henning Karlsen. * You can find and download them at: * www.RinkyDinkElectronics.com */ #include <UTFT.h> #include <URTouch.h> #include <EEPROM.h> //==== Creating Objects UTFT myGLCD(SSD1289,38,39,40,41); //Parameters should be adjusted to your Display/Schield model URTouch myTouch( 6, 5, 4, 3, 2); //==== Defining Fonts extern uint8_t SmallFont[]; extern uint8_t BigFont[]; extern uint8_t SevenSegNumFont[]; extern unsigned int bird01[0x41A]; // Bird Bitmap int x, y; // Variables for the coordinates where the display has been pressed // Floppy Bird int xP = 319; int yP = 100; int yB = 50; int movingRate = 3; int fallRateInt = 0; float fallRate = 0; int score = 0; int lastSpeedUpScore = 0; int highestScore; boolean screenPressed = false; boolean gameStarted = false; void setup() { // Initiate display myGLCD.InitLCD(); myGLCD.clrScr(); myTouch.InitTouch(); myTouch.setPrecision(PREC_MEDIUM); highestScore = EEPROM.read(0); // Read the highest score from the EEPROM initiateGame(); // Initiate the game } void loop() { xP=xP-movingRate; // xP - x coordinate of the pilars; range: 319 - (-51) drawPilars(xP, yP); // Draws the pillars // yB - y coordinate of the bird which depends on value of the fallingRate variable yB+=fallRateInt; fallRate=fallRate+0.4; // Each inetration the fall rate increase so that we can the effect of acceleration/ gravity fallRateInt= int(fallRate); // Checks for collision if(yB>=180 || yB<=0){ // top and bottom gameOver(); } if((xP<=85) && (xP>=5) && (yB<=yP-2)){ // upper pillar gameOver(); } if((xP<=85) && (xP>=5) && (yB>=yP+60)){ // lower pillar gameOver(); } // Draws the bird drawBird(yB); // After the pillar has passed through the screen if (xP<=-51){ xP=319; // Resets xP to 319 yP = rand() % 100+20; // Random number for the pillars height score++; // Increase score by one } //==== Controlling the bird if (myTouch.dataAvailable()&& !screenPressed) { fallRate=-6; // Setting the fallRate negative will make the bird jump screenPressed = true; } // Doesn't allow holding the screen / you must tap it else if ( !myTouch.dataAvailable() && screenPressed){ screenPressed = false; } // After each five points, increases the moving rate of the pillars if ((score - lastSpeedUpScore) == 5) { lastSpeedUpScore = score; movingRate++; } } // ===== initiateGame - Custom Function void initiateGame() { myGLCD.clrScr(); // Blue background myGLCD.setColor(114, 198, 206); myGLCD.fillRect(0,0,319,239); // Ground myGLCD.setColor(221,216,148); myGLCD.fillRect(0, 215, 319, 239); myGLCD.setColor(47,175,68); myGLCD.fillRect(0, 205, 319, 214); // Text myGLCD.setColor(0, 0, 0); myGLCD.setBackColor(221, 216, 148); myGLCD.setFont(BigFont); myGLCD.print("Score:",5,220); myGLCD.setFont(SmallFont); myGLCD.print("HowToMechatronics.com", 140, 220); myGLCD.setColor(0, 0, 0); myGLCD.setBackColor(114, 198, 206); myGLCD.print("Highest Score: ",5,5); myGLCD.printNumI(highestScore, 120, 6); myGLCD.print(">RESET<",255,5); myGLCD.drawLine(0,23,319,23); myGLCD.print("TAP TO START",CENTER,100); drawBird(yB); // Draws the bird // Wait until we tap the sreen while (!gameStarted) { if (myTouch.dataAvailable()) { myTouch.read(); x=myTouch.getX(); y=myTouch.getY(); // Reset higest score if ((x>=250) && (x<=319) &&(y>=0) && (y<=28)) { highestScore = 0; myGLCD.setColor(114, 198, 206); myGLCD.fillRect(120, 0, 150, 22); myGLCD.setColor(0, 0, 0); myGLCD.printNumI(highestScore, 120, 5); } if ((x>=0) && (x<=319) &&(y>=30) && (y<=239)) { gameStarted = true; myGLCD.setColor(114, 198, 206); myGLCD.fillRect(0, 0, 319, 32); } } } // Clears the text "TAP TO START" before the game start myGLCD.setColor(114, 198, 206); myGLCD.fillRect(85, 100, 235, 116); } // ===== drawPlillars - Custom Function void drawPilars(int x, int y) { if (x>=270){ myGLCD.setColor(0, 200, 20); myGLCD.fillRect(318, 0, x, y-1); myGLCD.setColor(0, 0, 0); myGLCD.drawRect(319, 0, x-1, y); myGLCD.setColor(0, 200, 20); myGLCD.fillRect(318, y+81, x, 203); myGLCD.setColor(0, 0, 0); myGLCD.drawRect(319, y+80, x-1, 204); } else if( x<=268) { // Draws blue rectangle right of the pillar myGLCD.setColor(114, 198, 206); myGLCD.fillRect(x+51, 0, x+60, y); // Draws the pillar myGLCD.setColor(0, 200, 20); myGLCD.fillRect(x+49, 1, x+1, y-1); // Draws the black frame of the pillar myGLCD.setColor(0, 0, 0); myGLCD.drawRect(x+50, 0, x, y); // Draws the blue rectangle left of the pillar myGLCD.setColor(114, 198, 206); myGLCD.fillRect(x-1, 0, x-3, y); // The bottom pillar myGLCD.setColor(114, 198, 206); myGLCD.fillRect(x+51, y+80, x+60, 204); myGLCD.setColor(0, 200, 20); myGLCD.fillRect(x+49, y+81, x+1, 203); myGLCD.setColor(0, 0, 0); myGLCD.drawRect(x+50, y+80, x, 204); myGLCD.setColor(114, 198, 206); myGLCD.fillRect(x-1, y+80, x-3, 204); } // Draws the score myGLCD.setColor(0, 0, 0); myGLCD.setBackColor(221, 216, 148); myGLCD.setFont(BigFont); myGLCD.printNumI(score, 100, 220); } //====== drawBird() - Custom Function void drawBird(int y) { // Draws the bird - bitmap myGLCD.drawBitmap (50, y, 35, 30, bird01); // Draws blue rectangles above and below the bird in order to clear its previus state myGLCD.setColor(114, 198, 206); myGLCD.fillRoundRect(50,y,85,y-6); myGLCD.fillRoundRect(50,y+30,85,y+36); } //======== gameOver() - Custom Function void gameOver() { delay(3000); // 1 second // Clears the screen and prints the text myGLCD.clrScr(); myGLCD.setColor(255, 255, 255); myGLCD.setBackColor(0, 0, 0); myGLCD.setFont(BigFont); myGLCD.print("GAME OVER", CENTER, 40); myGLCD.print("Score:", 100, 80); myGLCD.printNumI(score,200, 80); myGLCD.print("Restarting...", CENTER, 120); myGLCD.setFont(SevenSegNumFont); myGLCD.printNumI(2,CENTER, 150); delay(1000); myGLCD.printNumI(1,CENTER, 150); delay(1000); // Writes the highest score in the EEPROM if (score > highestScore) { highestScore = score; EEPROM.write(0,highestScore); } // Resets the variables to start position values xP=319; yB=50; fallRate=0; score = 0; lastSpeedUpScore = 0; movingRate = 3; gameStarted = false; // Restart game initiateGame(); }
Nguồn: http://dandientu.com
Blog chuyên đề điện tử về Arduino, ESP module, IOT
Xem video từ bài viết : http://dandientu.com/lap-trinh-nhung...n-arduino.html
Nguyên lý trò chơi cũng khá đơn giản, nhưng có thể gây nghiện, nhớ là đừng có ném thiết bị khi đang chơi nhé, kẻo tốn tiền. Bạn chạm vào màn hình cảm ứng để chú chim bay lên sao cho không bị va vào các cột đang di chuyển với tốc độ càng lúc càng nhanh. Trò chơi, có thể lưu lại điểm số ngay cả khi không cấp điện cho máy.
Để làm được dự án này, bạn cần hiểu cách lập trình màn hình cảm ứng TFT với Arduino.
Mã nguồn chương trình
Vì phần mã nguồn khá dài, nên bài viết sẽ mô tả từng phần, tất cả mã nguồn sẽ được đính kèm theo link phía dưới bài viết này.
Chúng ta sẽ sử dụng thư viện UTFT và URTouch của Henning Karlsen:
UTFT: http://www.rinkydinkelectronics.com/library.php?id=51
URTouch: http://www.rinkydinkelectronics.com/library.php?id=92
Chúng ta cũng cần thêm thư viên EEPROM để lưu trữ dữ liệu của game.
| 1 2 3 4 5 6 7 8 9 10 11 12 13 14 15 16 17 18 19 20 21 22 23 24 25 26 27 28 29 30 31 32 | #include < UTFT.h > #include < URTouch.h > #include < EEPROM.h > //==== Creating Objects UTFT myGLCD(SSD1289, 38, 39, 40, 41); //Parameters should be adjusted to your Display/Schield model URTouch myTouch(6, 5, 4, 3, 2); //==== Defining Fonts extern uint8_t SmallFont[]; extern uint8_t BigFont[]; extern uint8_t SevenSegNumFont[]; extern unsigned int bird01[0x41A]; // Bird Bitmap int x, y; // Variables for the coordinates where the display has been pressed // Floppy Bird int xP = 319; int yP = 100; int yB = 50; int movingRate = 3; int fallRateInt = 0; float fallRate = 0; int score = 0; int lastSpeedUpScore = 0; int highestScore; boolean screenPressed = false; boolean gameStarted = false; void setup() { // Initiate display myGLCD.InitLCD(); myGLCD.clrScr(); myTouch.InitTouch(); myTouch.setPrecision(PREC_MEDIUM); highestScore = EEPROM.read(0); // Read the highest score from the EEPROM initiateGame(); // Initiate the game } |
| 1 2 3 4 5 6 7 8 9 10 11 12 13 14 15 16 17 18 19 20 21 22 23 24 25 26 27 28 29 30 31 32 33 34 35 36 37 38 39 40 41 42 43 44 45 46 47 48 49 50 51 52 53 | // ===== initiateGame - Custom Function void initiateGame() { myGLCD.clrScr(); // Blue background myGLCD.setColor(114, 198, 206); myGLCD.fillRect(0, 0, 319, 239); // Ground myGLCD.setColor(221, 216, 148); myGLCD.fillRect(0, 215, 319, 239); myGLCD.setColor(47, 175, 68); myGLCD.fillRect(0, 205, 319, 214); // Text myGLCD.setColor(0, 0, 0); myGLCD.setBackColor(221, 216, 148); myGLCD.setFont(BigFont); myGLCD.print("Score:", 5, 220); myGLCD.setFont(SmallFont); myGLCD.print("HowToMechatronics.com", 140, 220); myGLCD.setColor(0, 0, 0); myGLCD.setBackColor(114, 198, 206); myGLCD.print("Highest Score: ", 5, 5); myGLCD.printNumI(highestScore, 120, 6); myGLCD.print(">RESET<", 255, 5); myGLCD.drawLine(0, 23, 319, 23); myGLCD.print("TAP TO START", CENTER, 100); drawBird(yB); // Draws the bird // Wait until we tap the sreen while (!gameStarted) { if (myTouch.dataAvailable()) { myTouch.read(); x = myTouch.getX(); y = myTouch.getY(); // Reset higest score if ((x >= 250) && (x <= 319) && (y >= 0) && (y <= 28)) { highestScore = 0; myGLCD.setColor(114, 198, 206); myGLCD.fillRect(120, 0, 150, 22); myGLCD.setColor(0, 0, 0); myGLCD.printNumI(highestScore, 120, 5); } if ((x >= 0) && (x <= 319) && (y >= 30) && (y <= 239)) { gameStarted = true; myGLCD.setColor(114, 198, 206); myGLCD.fillRect(0, 0, 319, 32); } } } // Clears the text "TAP TO START" before the game start myGLCD.setColor(114, 198, 206); myGLCD.fillRect(85, 100, 235, 116); } |
Trong phần vòng lặp chính chúng ta sử dụng biến xP, yP để vẽ các cột. Lúc đầu, biến xP có giá trị 319 là kích thước của màn hình và biến yP có giá trị là 100, là chiều cao của cột đầu tiên. Mỗi lần lặp lại giá trị của biến xP được giảm dần, giá trị của biến movingRate lúc đầu là 3 và khi chúng ta chơi, giá trị đó sẽ tăng lên.
| 1 2 3 4 5 6 7 8 9 10 11 12 13 14 15 16 17 18 19 20 21 22 23 24 25 26 27 28 29 30 31 32 33 34 35 36 37 38 39 40 41 42 43 44 45 46 | // The Main Loop Section void loop() { xP = xP - movingRate; // xP - x coordinate of the pilars; range: 319 - (-51) drawPilars(xP, yP); // Draws the pillars // yB - y coordinate of the bird which depends on value of the fallingRate variable yB += fallRateInt; fallRate = fallRate + 0.4; // Each inetration the fall rate increase so that we can the effect of acceleration/ gravity fallRateInt = int(fallRate); // Checks for collision if (yB >= 180 || yB <= 0) { // top and bottom gameOver(); } if ((xP <= 85) && (xP >= 5) && (yB <= yP - 2)) { // upper pillar gameOver(); } if ((xP <= 85) && (xP >= 5) && (yB >= yP + 60)) { // lower pillar gameOver(); } // Draws the bird drawBird(yB); // After the pillar has passed through the screen if (xP <= -51) { xP = 319; // Resets xP to 319 yP = rand() % 100 + 20; // Random number for the pillars height score++; // Increase score by one } //==== Controlling the bird if (myTouch.dataAvailable() && !screenPressed) { fallRate = -6; // Setting the fallRate negative will make the bird jump screenPressed = true; } // Doesn't allow holding the screen / you must tap it else if (!myTouch.dataAvailable() && screenPressed) { screenPressed = false; } // After each five points, increases the moving rate of the pillars if ((score - lastSpeedUpScore) == 5) { lastSpeedUpScore = score; movingRate++; } } |
Nguyên lý làm việc trong game: chúng ta có các cột rộng 50px di chuyển từ phải sang trái và mỗi cột sẽ có chiều cao ngẫu nhiên. Để làm cho chúng di chuyển, sau mỗi lần lặp, chúng ta cần phải xóa màn hình và vẽ lại các cột ở vị trí mới. Tuy nhiên, chúng ta không thể làm điều đó do tốc độ làm mới màn hình thấp, nên sẽ gây ra sự nhấp nháy trên màn hình đồ hoạ. Để kích hoạt tất cả các điểm ảnh, màn hình cần thêm một chút thời gian, vi vậy chúng ta sẽ chỉ vẽ lại những gì đang di chuyển.
| 1 2 3 4 5 6 7 8 9 10 11 12 13 14 15 16 17 18 19 20 21 22 23 24 25 26 27 28 29 30 31 32 33 34 35 36 37 38 39 40 41 42 | // ===== drawPlillars - Custom Function void drawPilars(int x, int y) { if (x >= 270) { myGLCD.setColor(0, 200, 20); myGLCD.fillRect(318, 0, x, y - 1); myGLCD.setColor(0, 0, 0); myGLCD.drawRect(319, 0, x - 1, y); myGLCD.setColor(0, 200, 20); myGLCD.fillRect(318, y + 81, x, 203); myGLCD.setColor(0, 0, 0); myGLCD.drawRect(319, y + 80, x - 1, 204); } else if (x <= 268) { // Draws blue rectangle right of the pillar myGLCD.setColor(114, 198, 206); myGLCD.fillRect(x + 51, 0, x + 60, y); // Draws the pillar myGLCD.setColor(0, 200, 20); myGLCD.fillRect(x + 49, 1, x + 1, y - 1); // Draws the black frame of the pillar myGLCD.setColor(0, 0, 0); myGLCD.drawRect(x + 50, 0, x, y); // Draws the blue rectangle left of the pillar myGLCD.setColor(114, 198, 206); myGLCD.fillRect(x - 1, 0, x - 3, y); // The bottom pillar myGLCD.setColor(114, 198, 206); myGLCD.fillRect(x + 51, y + 80, x + 60, 204); myGLCD.setColor(0, 200, 20); myGLCD.fillRect(x + 49, y + 81, x + 1, 203); myGLCD.setColor(0, 0, 0); myGLCD.drawRect(x + 50, y + 80, x, 204); myGLCD.setColor(114, 198, 206); myGLCD.fillRect(x - 1, y + 80, x - 3, 204); } // Draws the score myGLCD.setColor(0, 0, 0); myGLCD.setBackColor(221, 216, 148); myGLCD.setFont(BigFont); myGLCD.printNumI(score, 100, 220); } |
Trở lại phần vòng lặp chúng ta có biến yB là vị trí y của con chim và nó phụ thuộc vào tỷ lệ rơi xuống sau mỗi lần lặp tăng lên và theo cách đó chúng ta có được ảnh hưởng của gia tốc hoặc lực hấp dẫn. Ngoài ra, ở đây chúng ta kiểm tra va chạm và sử dụng lệnh if quản lý nếu chim chạm lên trên, lên mặt đất hoặc các cột thì trò chơi sẽ kết thúc.
| 1 2 3 4 5 6 7 8 9 | //====== drawBird() - Custom Function void drawBird(int y) { // Draws the bird - bitmap myGLCD.drawBitmap (50, y, 35, 30, bird01); // Draws blue rectangles above and below the bird in order to clear its previus state myGLCD.setColor(114, 198, 206); myGLCD.fillRoundRect(50,y,85,y-6); myGLCD.fillRoundRect(50,y+30,85,y+36); } |
Trở lại vòng lặp, chúng ta có thể thấy rằng sau khi một ống di chuyển đi qua màn hình, biến xP sẽ trả lại giá trị 319, chiều cao yP sẽ có giá trị ngẫu nhiên từ 20 đến 100 và điểm số sẽ tăng lên 1. Lệnh if kế tiếp là để điều khiển chú chim. Nếu chúng ta chạm lên màn hình, chúng ta sẽ thiết lập hệ số rơi là số âm sẽ làm cho chú chim bay lên và nếu ngược lại sẽ không có gì xẩy ra nếu chúng ta chạm và giữ ngón tay trên màn hình. Lệnh if cuối cùng tạo độ khó cho game, tốc độ di chuyển sẽ tăng lên sau khi người chơi đạt được điểm số. Cuối cùng là hàm gameOver(). Sau khi làm trễ 1 giây, nó sẽ xóa màn hình, in ra điểm số, nếu điểm số cao hơn điểm số cao nhất, nó sẽ ghi kết quả vào EEPROM, nó sẽ khởi tạo lại các giá trị bạn đầu của các biến trong game và cuối cùng nó sẽ gọi lại hàm initiateGame() và chạy lại game từ đầu.
| 1 2 3 4 5 6 7 8 9 10 11 12 13 14 15 16 17 18 19 20 21 22 23 24 25 26 27 28 29 30 31 32 33 34 | //======== gameOver() - Custom Function void gameOver() { delay(1000); // 1 second // Clears the screen and prints the text myGLCD.clrScr(); myGLCD.setColor(255, 255, 255); myGLCD.setBackColor(0, 0, 0); myGLCD.setFont(BigFont); myGLCD.print("GAME OVER", CENTER, 40); myGLCD.print("Score:", 100, 80); myGLCD.printNumI(score,200, 80); myGLCD.print("Restarting...", CENTER, 120); myGLCD.setFont(SevenSegNumFont); myGLCD.printNumI(2,CENTER, 150); delay(1000); myGLCD.printNumI(1,CENTER, 150); delay(1000); // Writes the highest score in the EEPROM if (score > highestScore) { highestScore = score; EEPROM.write(0,highestScore); } // Resets the variables to start position values xP=319; yB=50; fallRate=0; score = 0; lastSpeedUpScore = 0; movingRate = 3; gameStarted = false; // Restart game initiateGame(); } |
/* Arduino Game Proejct * Program made by Dejan Nedelkovski, * www.HowToMechatronics.com */ /* This program uses the UTFT and URTouch libraries * made by Henning Karlsen. * You can find and download them at: * www.RinkyDinkElectronics.com */ #include <UTFT.h> #include <URTouch.h> #include <EEPROM.h> //==== Creating Objects UTFT myGLCD(SSD1289,38,39,40,41); //Parameters should be adjusted to your Display/Schield model URTouch myTouch( 6, 5, 4, 3, 2); //==== Defining Fonts extern uint8_t SmallFont[]; extern uint8_t BigFont[]; extern uint8_t SevenSegNumFont[]; extern unsigned int bird01[0x41A]; // Bird Bitmap int x, y; // Variables for the coordinates where the display has been pressed // Floppy Bird int xP = 319; int yP = 100; int yB = 50; int movingRate = 3; int fallRateInt = 0; float fallRate = 0; int score = 0; int lastSpeedUpScore = 0; int highestScore; boolean screenPressed = false; boolean gameStarted = false; void setup() { // Initiate display myGLCD.InitLCD(); myGLCD.clrScr(); myTouch.InitTouch(); myTouch.setPrecision(PREC_MEDIUM); highestScore = EEPROM.read(0); // Read the highest score from the EEPROM initiateGame(); // Initiate the game } void loop() { xP=xP-movingRate; // xP - x coordinate of the pilars; range: 319 - (-51) drawPilars(xP, yP); // Draws the pillars // yB - y coordinate of the bird which depends on value of the fallingRate variable yB+=fallRateInt; fallRate=fallRate+0.4; // Each inetration the fall rate increase so that we can the effect of acceleration/ gravity fallRateInt= int(fallRate); // Checks for collision if(yB>=180 || yB<=0){ // top and bottom gameOver(); } if((xP<=85) && (xP>=5) && (yB<=yP-2)){ // upper pillar gameOver(); } if((xP<=85) && (xP>=5) && (yB>=yP+60)){ // lower pillar gameOver(); } // Draws the bird drawBird(yB); // After the pillar has passed through the screen if (xP<=-51){ xP=319; // Resets xP to 319 yP = rand() % 100+20; // Random number for the pillars height score++; // Increase score by one } //==== Controlling the bird if (myTouch.dataAvailable()&& !screenPressed) { fallRate=-6; // Setting the fallRate negative will make the bird jump screenPressed = true; } // Doesn't allow holding the screen / you must tap it else if ( !myTouch.dataAvailable() && screenPressed){ screenPressed = false; } // After each five points, increases the moving rate of the pillars if ((score - lastSpeedUpScore) == 5) { lastSpeedUpScore = score; movingRate++; } } // ===== initiateGame - Custom Function void initiateGame() { myGLCD.clrScr(); // Blue background myGLCD.setColor(114, 198, 206); myGLCD.fillRect(0,0,319,239); // Ground myGLCD.setColor(221,216,148); myGLCD.fillRect(0, 215, 319, 239); myGLCD.setColor(47,175,68); myGLCD.fillRect(0, 205, 319, 214); // Text myGLCD.setColor(0, 0, 0); myGLCD.setBackColor(221, 216, 148); myGLCD.setFont(BigFont); myGLCD.print("Score:",5,220); myGLCD.setFont(SmallFont); myGLCD.print("HowToMechatronics.com", 140, 220); myGLCD.setColor(0, 0, 0); myGLCD.setBackColor(114, 198, 206); myGLCD.print("Highest Score: ",5,5); myGLCD.printNumI(highestScore, 120, 6); myGLCD.print(">RESET<",255,5); myGLCD.drawLine(0,23,319,23); myGLCD.print("TAP TO START",CENTER,100); drawBird(yB); // Draws the bird // Wait until we tap the sreen while (!gameStarted) { if (myTouch.dataAvailable()) { myTouch.read(); x=myTouch.getX(); y=myTouch.getY(); // Reset higest score if ((x>=250) && (x<=319) &&(y>=0) && (y<=28)) { highestScore = 0; myGLCD.setColor(114, 198, 206); myGLCD.fillRect(120, 0, 150, 22); myGLCD.setColor(0, 0, 0); myGLCD.printNumI(highestScore, 120, 5); } if ((x>=0) && (x<=319) &&(y>=30) && (y<=239)) { gameStarted = true; myGLCD.setColor(114, 198, 206); myGLCD.fillRect(0, 0, 319, 32); } } } // Clears the text "TAP TO START" before the game start myGLCD.setColor(114, 198, 206); myGLCD.fillRect(85, 100, 235, 116); } // ===== drawPlillars - Custom Function void drawPilars(int x, int y) { if (x>=270){ myGLCD.setColor(0, 200, 20); myGLCD.fillRect(318, 0, x, y-1); myGLCD.setColor(0, 0, 0); myGLCD.drawRect(319, 0, x-1, y); myGLCD.setColor(0, 200, 20); myGLCD.fillRect(318, y+81, x, 203); myGLCD.setColor(0, 0, 0); myGLCD.drawRect(319, y+80, x-1, 204); } else if( x<=268) { // Draws blue rectangle right of the pillar myGLCD.setColor(114, 198, 206); myGLCD.fillRect(x+51, 0, x+60, y); // Draws the pillar myGLCD.setColor(0, 200, 20); myGLCD.fillRect(x+49, 1, x+1, y-1); // Draws the black frame of the pillar myGLCD.setColor(0, 0, 0); myGLCD.drawRect(x+50, 0, x, y); // Draws the blue rectangle left of the pillar myGLCD.setColor(114, 198, 206); myGLCD.fillRect(x-1, 0, x-3, y); // The bottom pillar myGLCD.setColor(114, 198, 206); myGLCD.fillRect(x+51, y+80, x+60, 204); myGLCD.setColor(0, 200, 20); myGLCD.fillRect(x+49, y+81, x+1, 203); myGLCD.setColor(0, 0, 0); myGLCD.drawRect(x+50, y+80, x, 204); myGLCD.setColor(114, 198, 206); myGLCD.fillRect(x-1, y+80, x-3, 204); } // Draws the score myGLCD.setColor(0, 0, 0); myGLCD.setBackColor(221, 216, 148); myGLCD.setFont(BigFont); myGLCD.printNumI(score, 100, 220); } //====== drawBird() - Custom Function void drawBird(int y) { // Draws the bird - bitmap myGLCD.drawBitmap (50, y, 35, 30, bird01); // Draws blue rectangles above and below the bird in order to clear its previus state myGLCD.setColor(114, 198, 206); myGLCD.fillRoundRect(50,y,85,y-6); myGLCD.fillRoundRect(50,y+30,85,y+36); } //======== gameOver() - Custom Function void gameOver() { delay(3000); // 1 second // Clears the screen and prints the text myGLCD.clrScr(); myGLCD.setColor(255, 255, 255); myGLCD.setBackColor(0, 0, 0); myGLCD.setFont(BigFont); myGLCD.print("GAME OVER", CENTER, 40); myGLCD.print("Score:", 100, 80); myGLCD.printNumI(score,200, 80); myGLCD.print("Restarting...", CENTER, 120); myGLCD.setFont(SevenSegNumFont); myGLCD.printNumI(2,CENTER, 150); delay(1000); myGLCD.printNumI(1,CENTER, 150); delay(1000); // Writes the highest score in the EEPROM if (score > highestScore) { highestScore = score; EEPROM.write(0,highestScore); } // Resets the variables to start position values xP=319; yB=50; fallRate=0; score = 0; lastSpeedUpScore = 0; movingRate = 3; gameStarted = false; // Restart game initiateGame(); }
Nguồn: http://dandientu.com
Blog chuyên đề điện tử về Arduino, ESP module, IOT

Comment